
May 27, 2025
The Ultimate Guide to GitHub Branches

GitHub is a powerful platform for version control and collaboration, and understanding how to effectively use branches is essential for software engineers. In this comprehensive guide, we'll explore the basics of GitHub branches, setting up your repository, working with branches, making changes, merging and deleting branches, advanced branching techniques, best practices, and troubleshooting common issues. By the end, you'll have a solid understanding of GitHub branches and the confidence to leverage their full potential in your projects.
Understanding the Basics of GitHub Branches
Before diving into GitHub branches, let's first establish a foundation by understanding what GitHub is and what a branch represents in the context of GitHub.
What is GitHub?
GitHub is a web-based platform that allows developers to collaborate on projects using Git, a distributed version control system. It provides a centralized hub for storing, managing, and tracking changes to code repositories.
GitHub offers a wide range of features such as issue tracking, project management tools, and integration with various third-party services, making it a versatile platform for software development. It also allows for easy code review processes through pull requests, where developers can discuss changes, suggest improvements, and ensure code quality before merging it into the main codebase.
What is a Branch in GitHub?
A branch in GitHub is essentially a parallel version of your project's codebase. It allows you to work on features, bug fixes, or experiments independently without affecting the main codebase. Branches enable collaboration, as multiple developers can work on different branches simultaneously and merge their changes seamlessly.
Each branch in GitHub has its own commit history, which tracks the changes made to that specific branch over time. This history allows developers to review the evolution of a feature, understand the reasoning behind certain decisions, and pinpoint where issues may have been introduced.
Importance of Branches in GitHub
Branches play a crucial role in GitHub because they facilitate a structured and organized workflow. They enable developers to isolate changes, experiment with new ideas, and work collaboratively without causing conflicts or introducing errors into the main codebase. Branches also provide a safety net by allowing you to easily revert changes or recover lost work.
Furthermore, branches in GitHub can be used for different purposes such as maintaining different versions of a software product, implementing hotfixes for critical issues, or testing new features before integrating them into the main codebase. This flexibility and versatility make branches a powerful tool for managing the development lifecycle of a project effectively.
Setting Up Your GitHub Repository
Now that we have a good understanding of GitHub and branches, let's explore how to set up your repository to start using branches effectively.
Before diving into the world of repositories and branches, it's important to understand the significance of a README file. A README file serves as the introduction to your project, providing essential information such as what the project does, how to set it up, and any other relevant details. It's like the cover of a book, giving readers a glimpse of what's inside before they delve deeper.
Creating a New Repository
To create a new repository in GitHub, navigate to your GitHub account and click on the "New" button. Give your repository a meaningful name and provide a brief description. Optionally, you can initialize the repository with a README file or add a .gitignore file to specify which files to ignore when committing changes.
When adding a .gitignore file, you're essentially telling Git to ignore certain files or directories when tracking changes. This is particularly useful for excluding sensitive information like API keys, configuration files, or temporary files from being accidentally committed to the repository.
Cloning an Existing Repository
If you're working with an existing repository, you can clone it to your local machine to start contributing. On the repository's main page, click on the "Code" button and choose the "Clone" option. Copy the repository's URL and use a Git client or the command line to clone the repository locally.
Cloning a repository not only downloads the files to your local machine but also establishes a connection between your local copy and the original repository. This connection allows you to pull the latest changes from the remote repository and push your contributions back, enabling seamless collaboration with other team members.
Working with GitHub Branches
Now that your repository is set up, let's dive into working with branches and explore the different actions you can perform.
Branches in GitHub are a powerful feature that allow you to work on different versions of your project simultaneously. This can be useful for implementing new features, fixing bugs, or experimenting with changes without affecting the main branch.
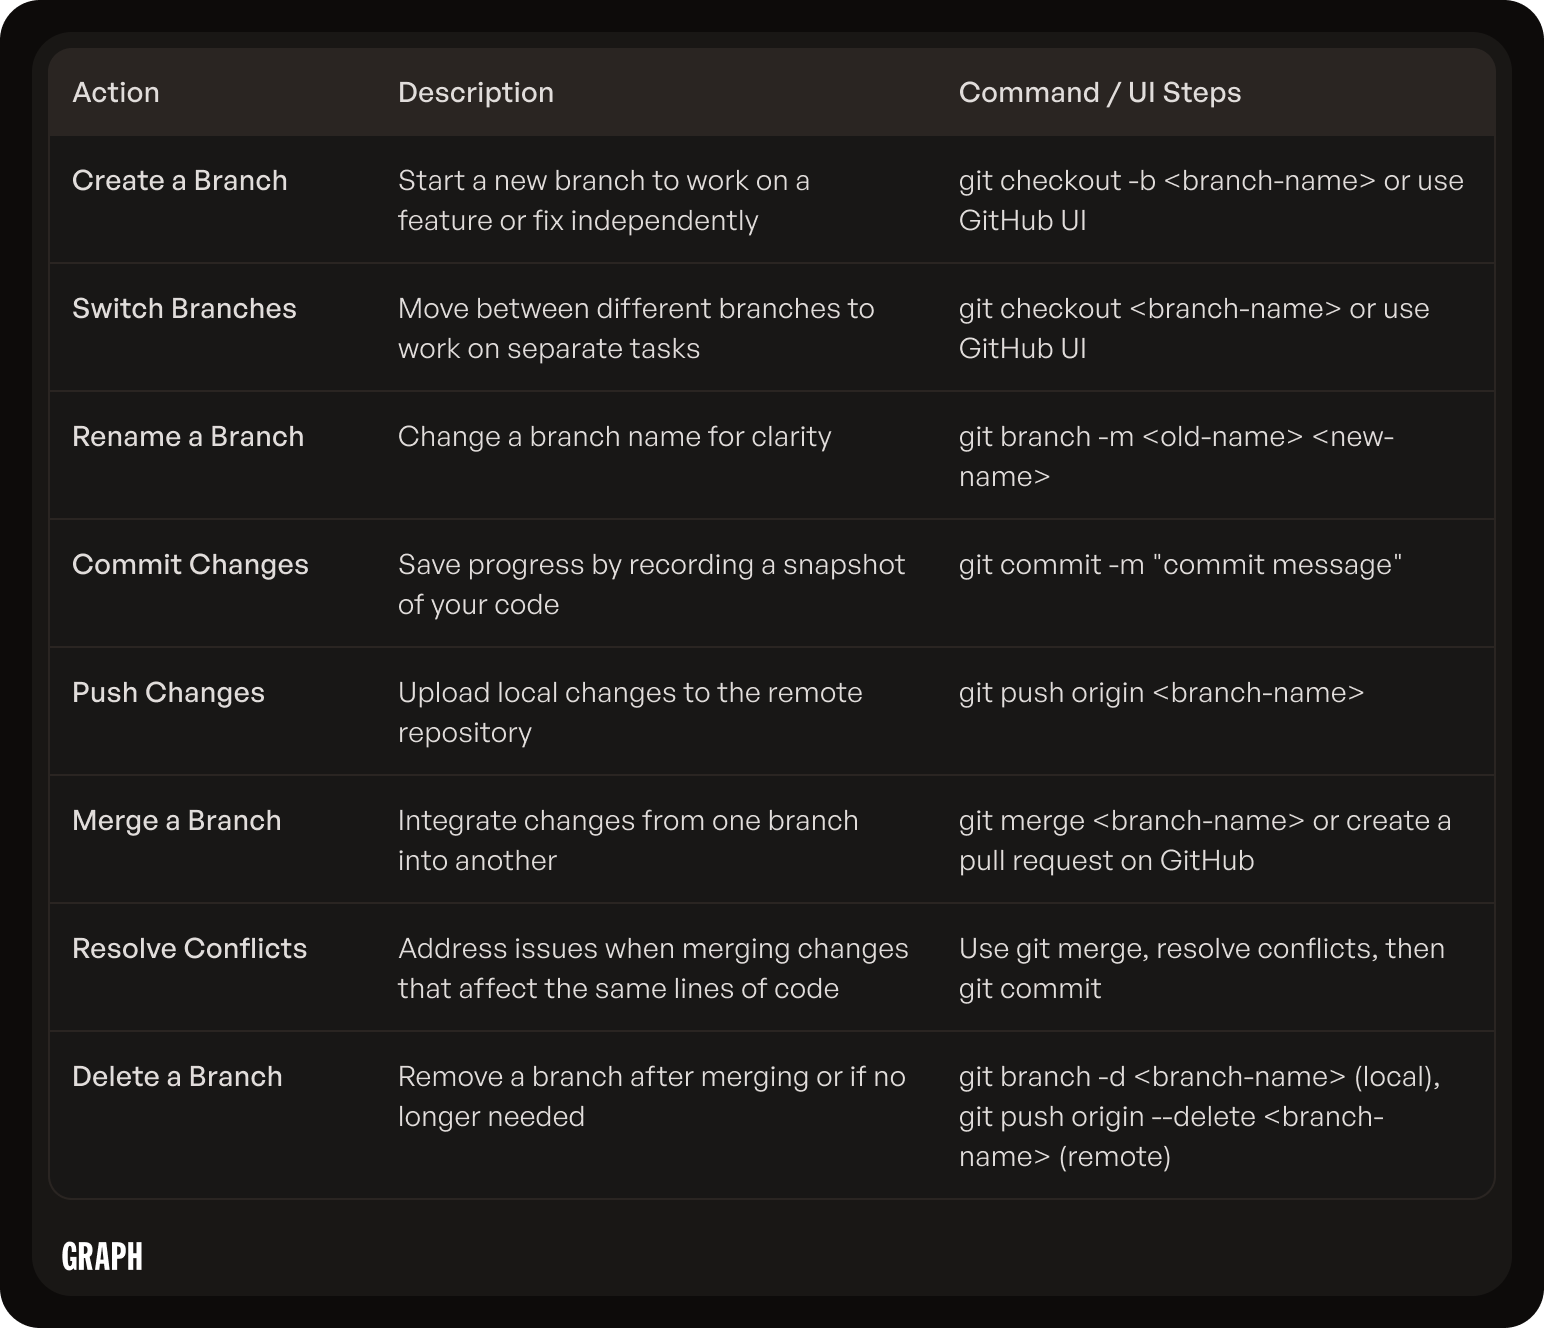
Creating a New Branch
To create a new branch in GitHub, navigate to your repository's main page and click on the "Branch: main" dropdown. Enter a descriptive name for your new branch and click on the "Create branch" button. This will create a new branch based on the latest commit of the main branch.
When creating a new branch, it's a good practice to give it a meaningful name that reflects the purpose of the changes you plan to make. This will help you and your collaborators easily identify the branch and understand its context.
Switching Between Branches
To switch between branches in GitHub, navigate to your repository's main page and use the "Branch: [current branch]" dropdown to select the desired branch. GitHub will automatically load the selected branch, allowing you to view and modify its contents.
Switching between branches is seamless in GitHub, enabling you to quickly shift your focus from one set of changes to another. This flexibility is particularly handy when you need to work on multiple tasks concurrently or collaborate with team members on different features.
Renaming a Branch
If you need to rename a branch in GitHub, navigate to your repository's main page and click on the "Branch: [branch name]" dropdown. Click on the pencil icon next to the branch name and enter the new name. GitHub will update the branch's name accordingly.
Branch names should ideally be descriptive and concise, reflecting the purpose or scope of the changes within the branch. Renaming a branch to accurately represent its contents can enhance clarity and organization within your repository, making it easier for you and others to navigate and understand the project's development history.
Making Changes in a Branch
With your branch set up, it's time to start making changes to your project. In this section, we'll explore committing changes and pushing them to your branch.
Before diving into the process of committing and pushing changes, it's important to understand the significance of version control. Version control allows developers to track and manage changes to their codebase over time. By using version control systems like Git, developers can collaborate effectively, revert to previous versions if needed, and maintain a detailed history of all modifications made to the project.
Committing Changes
Committing changes in GitHub captures a snapshot of the current state of your branch. You can think of a commit as a checkpoint that allows you to track the progress of your project. To commit changes, navigate to your repository's main page and click on the "Code" tab. Select the file(s) you want to commit, enter a descriptive commit message, and click on the "Commit changes" button.
When crafting a commit message, it's essential to provide clear and concise information about the changes being made. A well-written commit message helps team members understand the purpose of the commit without having to inspect the actual code changes. It's good practice to follow a consistent format for commit messages, such as starting with a verb in the imperative mood (e.g., "Add feature" instead of "Added feature").
Pushing Changes to a Branch
Pushing changes in GitHub is the process of uploading your local commits to the corresponding branch in the remote repository. This ensures that your changes are shared with the rest of the team. To push changes, use a Git client or the command line and execute the "git push" command, specifying the branch you want to push your changes to.
Before pushing your changes, it's a good practice to pull the latest changes from the remote repository to avoid potential conflicts. By staying up to date with the remote branch, you can minimize merge conflicts and ensure a smoother integration of your changes. Additionally, it's important to communicate with your team members about the changes you're pushing to keep everyone informed and aligned on the project's progress.
Merging and Deleting GitHub Branches
As your project evolves, you'll need to merge branches and clean up unnecessary branches. In this section, we'll explore the process of merging branches, resolving merge conflicts, and deleting branches.
When working on collaborative projects in GitHub, merging branches is a crucial step in integrating new features or bug fixes. It allows developers to combine their code changes from separate branches into a single branch, ensuring that the final product is cohesive and functional. Merging branches not only streamlines the development process but also helps maintain a clear version history of the project.
Merging Branches
Merging branches in GitHub combines the changes from one branch into another. This is typically done when you're ready to incorporate your branch's changes into the main branch. To merge branches, navigate to your repository's main page and click on the "Pull requests" tab. Create a new pull request, compare the branches you want to merge, review the changes, and click on the "Merge" button.
Before merging branches, it's essential to ensure that the changes are compatible and do not conflict with each other. Thorough testing and code reviews can help identify any potential issues before merging, reducing the likelihood of introducing bugs into the codebase.
Resolving Merge Conflicts
When merging branches, conflicts may arise if the changes made in both branches overlap. Resolving merge conflicts involves carefully reviewing the conflicting changes and manually selecting the desired outcome. GitHub provides helpful tools to guide you through the conflict resolution process.
Effective communication among team members is key to resolving merge conflicts efficiently. By discussing the conflicting changes and understanding the reasoning behind each modification, developers can collaborate to find the best solution that aligns with the project's goals and requirements.
Deleting Branches
Deleting branches in GitHub removes them from the repository, keeping your project's repository clean and organized. To delete a branch, navigate to your repository's main page and click on the "Branch: [branch name]" dropdown. Select the branch you want to delete and click on the "Delete branch" button.
Regularly cleaning up obsolete branches is essential for maintaining a tidy repository structure. By removing redundant branches that have served their purpose or are no longer needed, developers can declutter the repository and improve overall project management. Deleting branches also helps prevent confusion and ensures that only relevant branches are visible to team members, promoting a more efficient workflow.
Advanced Branching Techniques
Now that you're comfortable with the basics of GitHub branches, let's explore advanced techniques that can enhance your workflow and collaboration with other developers.
Mastering advanced branching techniques can significantly boost your productivity and streamline your development process. By delving deeper into the intricacies of branching, you can optimize your workflow and ensure seamless collaboration with your team members.
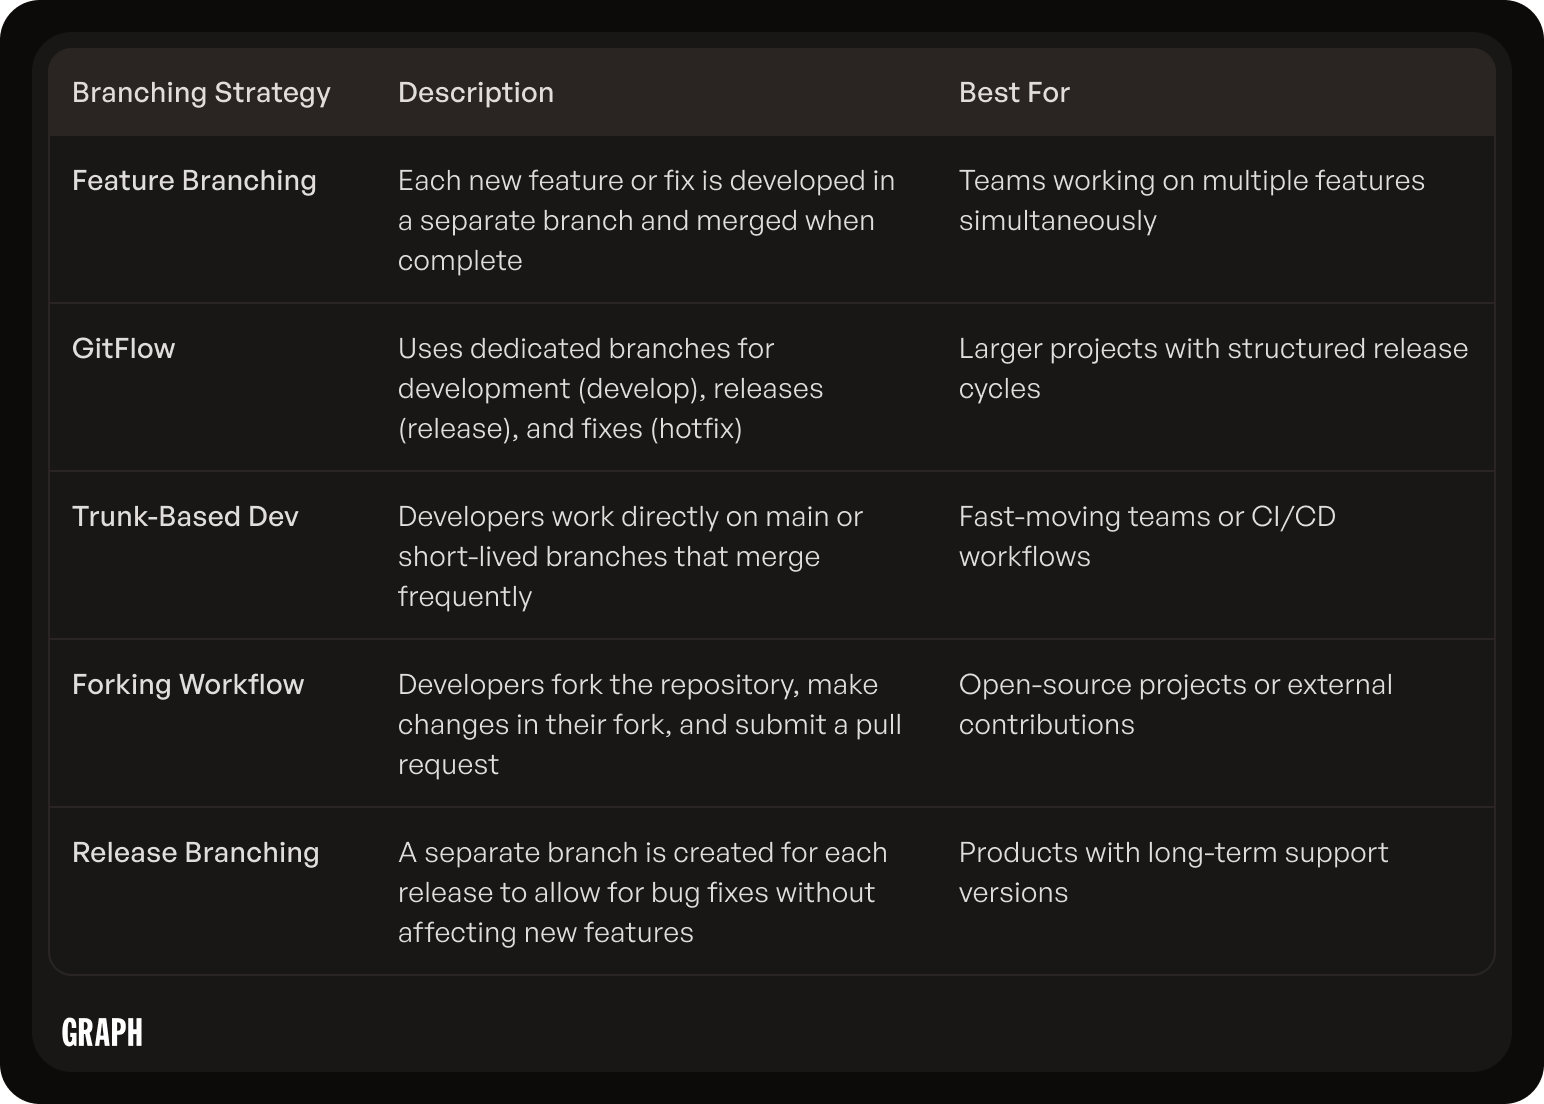
Branching Strategies for Teams
When working in a team, it's crucial to establish a clear branching strategy to ensure smooth collaboration and minimize conflicts. Common branching strategies include the GitFlow model, trunk-based development, and feature branching. Consider the size of your team, project complexity, and release cycles when choosing a branching strategy.
Each branching strategy has its own advantages and challenges, so it's essential to select the one that best aligns with your team's goals and project requirements. By carefully evaluating the pros and cons of each strategy, you can tailor your approach to maximize efficiency and productivity.
Using Forks and Pull Requests
Forking a repository creates an independent copy of the original repository under your GitHub account. Forks are commonly used in open-source projects to allow contributors to propose changes. Pull requests enable contributors to submit their changes to the original repository, initiating a review process before merging the changes.
By leveraging forks and pull requests effectively, you can facilitate a seamless collaboration process and maintain a structured workflow. These tools empower developers to contribute to projects without directly impacting the main codebase, ensuring a systematic approach to code integration and review.
Protecting Branches
In some cases, it may be necessary to protect specific branches from accidental or unauthorized changes. GitHub provides branch protection rules that allow you to enforce certain restrictions, such as requiring code reviews, status checks, and branch restrictions.
Branch protection mechanisms play a vital role in safeguarding your codebase and maintaining the integrity of your project. By implementing robust branch protection rules, you can mitigate the risk of errors and unauthorized modifications, ensuring a secure and stable development environment for your team.
Best Practices for Using GitHub Branches
To optimize your GitHub branching workflow, it's important to follow best practices and establish a structured approach. Let's explore some key practices that will help you make the most of GitHub branches.
Keeping Your Branches Organized
Maintaining an organized branch structure is essential as it improves collaboration and makes it easier to track changes. Use descriptive names for your branches that reflect their purpose, and consider organizing them based on features, bug fixes, or development stages.
Furthermore, when organizing your branches, consider creating a naming convention that all team members can follow. This consistency will streamline communication and make it easier for everyone to understand the purpose of each branch. For example, you could use prefixes like "feat/" for feature branches, "bug/" for bug fix branches, and "dev/" for development stage branches.
Regularly Updating and Reviewing Branches
It's important to keep your branches up to date with the latest changes from the main branch. Regularly fetch and merge changes from the main branch to ensure that your work is based on the latest codebase. Additionally, review the changes in your branches regularly to identify and address any issues early on.
Consider setting up automated checks or continuous integration tools to ensure that your branches remain in sync with the main branch. By automating this process, you can catch integration issues sooner and prevent conflicts that may arise from diverging codebases.
Using Descriptive Names for Branches
Choosing meaningful and descriptive names for your branches will make it easier for you and your team to understand their purpose. Avoid generic names like "feature" or "bugfix" and instead provide clear identifiers that convey the intended changes or functionality.
When naming your branches, think about including issue or task numbers from your project management system, if applicable. This linkage can provide valuable context and traceability, especially when looking back at the history of a particular branch. Additionally, consider using a consistent format for branch names, such as lowercase letters with hyphens for readability and uniformity.
Troubleshooting Common Issues with GitHub Branches
While working with GitHub branches, you may encounter some common issues that can hinder your progress. Let's explore how to troubleshoot and resolve these issues effectively.
Recovering Deleted Branches
If you accidentally delete a branch, don't worry! GitHub provides options to recover deleted branches. Navigate to your repository's main page, select the "Branches" tab, and click on the "View all branches" link. From there, you can restore the deleted branch using the "Restore" button.
Dealing with Stuck Branches
Occasionally, branches may become stuck due to conflicts or other issues. If you find yourself unable to make progress on a branch, evaluate the cause of the issue. Review any existing pull requests, resolve conflicts if needed, and ensure that you have the necessary permissions to make changes.
Resolving Permission Issues
If you encounter permission issues while working with branches, ensure that you have the necessary access rights. Contact your repository's administrators if you require additional permissions. It's important to have the appropriate privileges to create, merge, and delete branches.
By following these guidelines and leveraging the full power of GitHub branches, you'll be able to streamline your development process, collaborate effectively with your team, and build robust software projects. Happy branching!
